Will It Lens? Temperature Breakthrough!
In case you missed it, here are the other parts of the Will It Lens? series. I know I haven’t updated in a while, and I’ve got a huge backlog of pictures. So, part will be discussed here and I already have enough for another post as well.
Remember that all the safety warnings from the other posts in the series still apply here, though I don’t have anything new to add. Thanks for all the suggestions you’ve given us; we’ve tried some, and there have been quite a few good ones!
We’ve made a few improvements to our setup:
- Someone had suggested we put a mirror under the focal point, which prevents us from accidentally burning the ground if the focal point is too low. Thanks; it was a great suggestion!
- One very windy day, the stand blew over, and cracked the lens. That totally sucked. It still works, but not as well. Luckily, we had that second lens that the company had sent us because the first arrived with a corner chipped off. So, we built a new stand for the second lens, and we learned from our mistakes. The new stand is taller, it’s sturdier, it won’t blow over, and the lens won’t rotate and wobble in the wind. However, it could still wobble side to side, which resulted in two of the legs getting ripped off one day while we were setting up (two legs were off the ground, and the other two were at a horrible angle and had lots of torque put on them). We’ve reattached them and made them sturdier, though there’s still a small amount of side-to-side wobbling. So, anyone suggesting we build a steam engine or a Rube Goldberg device or anything: no, we’re bad at building stuff.
- We’ve bought more #12 welding filters, so more people can have eye protection. They’re really cheap (about $2 each) if you don’t buy the goggles to go with them (just hold the filter up in front of your eyes).
Anyway, results. Take a guess what this is:

If I didn’t know this was about the lens, I’d have guessed it was a lava flow. It turns out it’s a marshmallow!
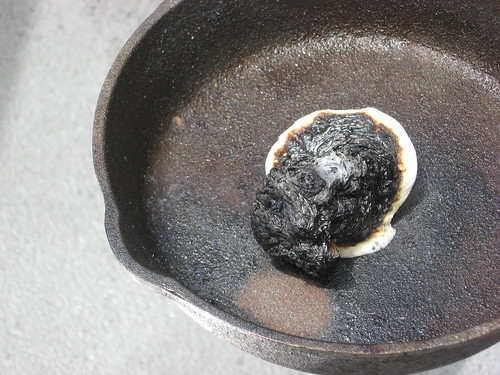
The top of the marshmallow started off white, so it reflected most of the light and didn’t heat up much. Then, a spot got hot enough to burn, and turned black. This let it absorb much more light, and the black spot quickly radiated out to the rest of the top. and then it heated up enough that the marshmallow just beneath the surface melted, and we had this piece of black char floating on a layer of molten marshmallow. Our skillet wasn’t level, so the char slid off to one side, exposing the marshmallow under it to the air, which would in turn char, slide off, expose more marshmallow, etc. So, the comparison to lava is more apt than I’d have expected: they’re both formed by solid material floating over a layer of molten material which turns solid when exposed to air. Neat!
and speaking of marshmallows, we did peeps by popular demand (wow, have I really not posted since before Easter!?).
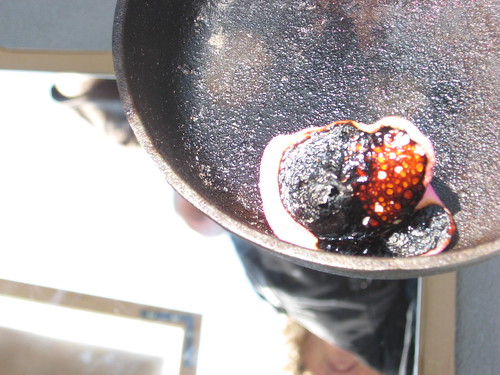
The peep charred easily and then boiled (note the bubbles on the right). On the left, part of the peep boiled from the inside, which pushed up the char into a cone shape. We haved dubbed this “volcanoing.” We’ve gotten marshmallows to do this too, with great success (particularly when it’s on a level surface and doesn’t slide sideways):
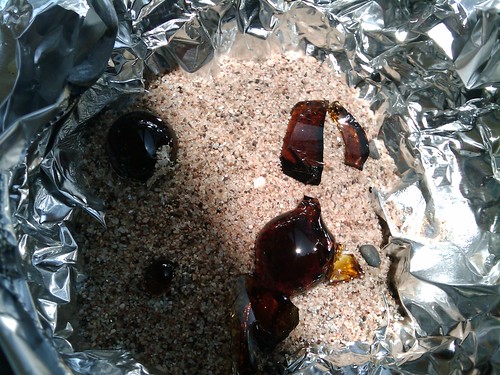
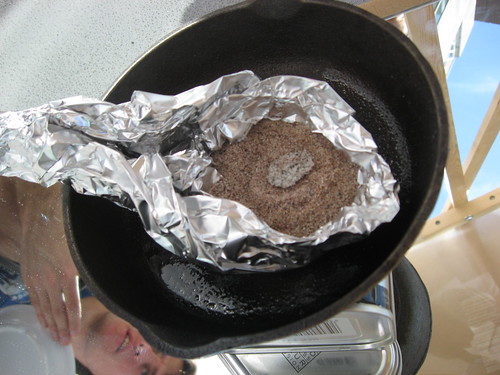
Moving away from foodstuffs, we’ve had a lot of people write to us claiming to have achieved much higher temperatures with a similar lens. It occurred to us that all our holders are made of metal (aluminum foil, iron skillet, steel pliers), which conducts heat well and therefore might act as a heat sync. So, we tried getting an insulated holder—sand. Both air and quartz are good insulators, so not much heat should dissipate through either. So, we tried a solid copper penny, which we had never been able to melt before.

Holy crap, it totally worked!!

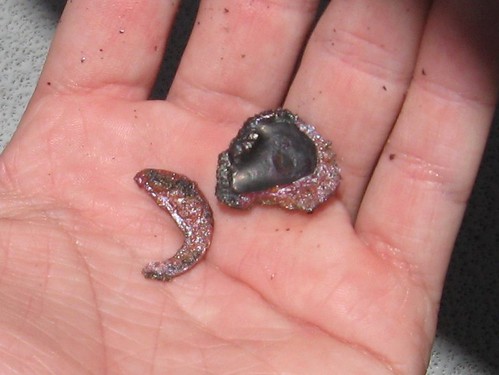
Yes, it is glowing red-hot! So, we can totally get to the 1356 K needed to melt copper, though it oxidizes and turns black in the process. We cooled it down by putting it in a cup of water, and the thermal shock was enough that it cracked in two.
There are some gorgeous colors on the inside, ranging from green to purple to “copper” colored. Unfortunately, I don’t have a good pic of that.
Now that we could achieve much higher temperatures, we tried making steel. We took some iron filings from the oxygen-absorbing packet in our beef jerky, charred a marshmallow to make charcoal (we’re discussing it in the video above), and combined the two:

It turns out that making steel is actually a tricky process. The iron melted and re-solidified into a very brittle blob, and it didn’t work at all. We figure that to do it properly, we’ll need real charcoal and not just burnt sugar, and we’ll need to stir it all together (not possible with our current setup in the sand). but we did melt iron, which happens at an impressive 1811 K!
Wondering whether the sky was the limit (no pun intended), we tried melting sand itself. Like the copper, we could get it to glow red-hot.

Our sand came from the local beach, which means it was probably full of dead plankton and stuff. It started off reddish but it turns whitish when heated. Small grains would also pop and jump at the very beginning; no idea what that was (something holding grains together but under stress?). but in the end, we had indeed fused our sand together!
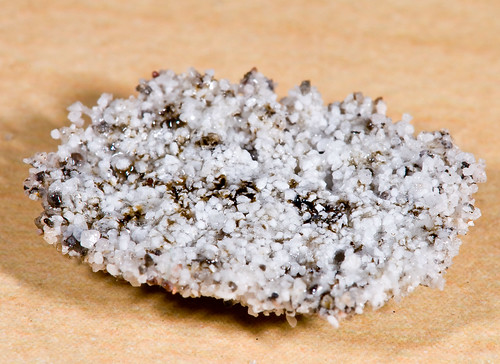
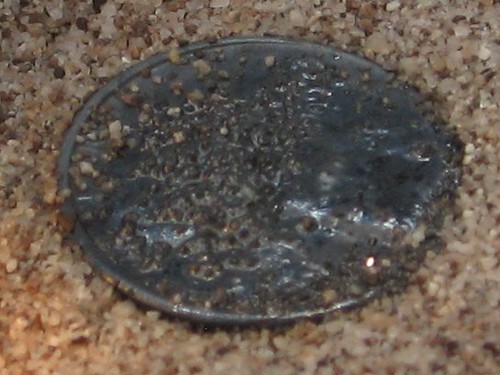
To give a sense of the scale here, this entire piece is about the size of a dime (1 cm across, a few millimeters thick). So did we melt quartz (which happens at over 1900 K)? Let’s take a closer look (side note: macro lenses are awesome when you have a photographer who knows what they’re doing; thanks Kevin!):
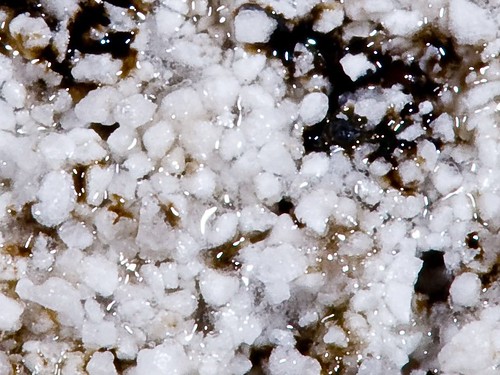

Well, something whitish (we assume quartz) didn’t melt. but the black parts (iron; we could drag a magnet through the sand and get little iron filings out) melted, and it was held together by a clear, glassy substance. We suspect this is feldspar, which is apparently a common ingredient in sand and which melts at a mere 1500-ish K. Feldspar also comes in both red and clear varieties, which explains the color change.
We suspect we could melt the quartz if it absorbed more energy (since it’s white, most of the light reflected off it), but so far our efforts here have been fruitless. The plan has been to put the quartz on something black (which will absorb more light, heat up more, and then melt the quartz when it’s hot enough). We tried putting a few grains of sand on top of a solid copper penny (which oxidizes and turns black as it heats up), but something strange happened: we ended up with a very thin layer of copper oxide on top of the quartz!
We have three theories as to why that might have happened. One involves saying words like “cohesion,” “adhesion,” and “surface tension” while waving your arms wildly, but it’s not a very sound idea just yet. Another involves the quartz sinking into the molten CuO, but it’s not good at explaining the bumps in the surface that are still shaped like grains of sand. The third involves the CuO “steaming” and evaporating slightly but then cooling down and becoming solid again on top of the quartz (remember that we don’t need to boil it to get it to steam), but there is enough CuO deposited on the quartz that this seems unlikely.
In a similar theme to “melt silica if only it were darker,” we tried a beer bottle.
It tended to bead up like water on a waxed car. We were surprised at how easy it was to do, so we read up on what glass is really made of. Despite the common belief that it’s pure quartz, most glass is a variation of “sodalime glass,” and it’s been that way since the Phoenicians were around. Back then, people had wood fires but no coal-powered forges, so they couldn’t melt pure quartz. Instead, they mixed in soda (sodium carbonate; similar to baking soda, which is sodium bicarbonate), which lowers the melting point significantly (such materials are called fluxes). However, soda glass on its own is water soluble, and therefore not very good for making glasses and pitchers. However, if you add in lime (calcium oxide; similar to limestone, which is calcium carbonate), it becomes water insoluble (materials like lime are called stabilizers), and that’s the glass we all know and love. Sometimes potash (potassium carbonate) is used instead of soda, which leads to potash glass. You can then add various other impurities to change the color (add iron to get it a dark brown like a beer bottle). Anyway, it turns out that the melting point of sodalime glass is around 1200 K (give or take a lot, depending on the ratios of quartz and soda). This explains why we had no trouble melting the beer bottle but we still haven’t melted quartz itself. We’ve got some pie-in-the-sky ideas about making our own sodalime glass from the raw materials, but I’m not sure we’ll actually be able to pull it off.
I’ve got more pictures, but I’ll save those for the next post.
That big lump of sand is so cool. I would love to have some. Seriously. Any way I can send you guys S&H and I can have a big lump of sand delivered?
To clarify, this is not a “big” lump of sand; it’s smaller than my thumbnail. It looks so big because we had a really good photographer with us that day. Here’s the lump of sand with a bit more context:
It’s just that whitish bit; the rest of the sand was unaffected. I have edited my description to make the size more clear.
Also, the mirror on the floor makes for some confusing photos. The skillet is on top of an aluminum box, which is sitting on its lid, which is on the mirror. In the reflection, you can see the skillet again, so the mirror/floor is halfway between the two images.
Where did you buy the lens from?
Hello:
I would like to get a similar lens. Where did you buy your lens from?
Re: Where did you buy the lens from?
I’m pretty sure we got it from here. I’ve updated the FAQ on the main page to reflect this.
There’s a fellow with a much better precision lens setup: http://www.youtube.com/watch?v=z0_nuvPKIi8